Whatever you call it, the
toilet is one of the most important items in your house. While the color and cost matter, how much water it uses and how well it flushes matter more. A good one conserves water and generates enough power to clean the bowl in a single flush. (A bad one can be a 20-year pain in the butt.) This article will help you choose a high-performance dunny that will fit your bathroom, budget and backside.
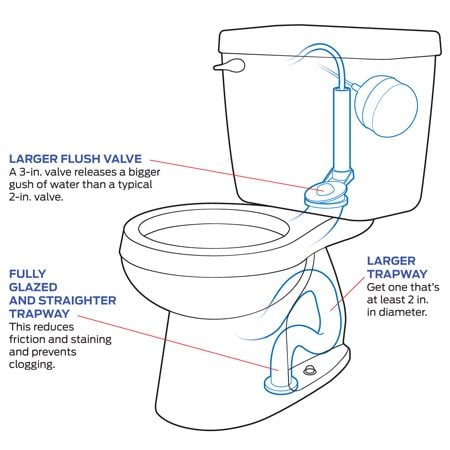
A new generation of low-flow models
Since 1994, low-flow toilets that use 1.6 gallons per flush (gpf) or less have been the federal standard. The first generation of low-flow toilets sucked—or rather, they didn't. That's mostly because manufacturers tweaked a few things to reduce the amount of water used but didn't change the basic design. You had to flush the darn thing twice (so much for water savings!). But 15 years later, more of these toilets actually work. Manufacturers have made significant design improvements such as larger trap-ways to prevent clogging and larger flush valves that allow a more powerful rush of water to enter the bowl. The following tips will make choosing a new toilet a lot easier.
Don't pinch pennies
You can get a “contractor special” for less than $75. But everything from the working parts to the quality of the glazing will likely be low quality. And don't expect a powerful flush from a cheap toilet. You're going to use your toilet every day for years, so get a good one. Plan to spend $100 to $500 for a gravity toilet and $225 to $600 for a pressure-assist model.
Shop plumbing supply houses and bathroom showrooms
Home centers offer some but not all of the top-ranked toilets. For the widest selections in makes and models, visit bathroom showrooms and check online retailers.
Unique features can cost you later
Custom seats and unusual flush mechanisms add a cool factor, but they'll cost you time, money and frustration if they ever need replacing. A replacement custom seat, for example, costs more than $100 (if you can even find one years later).
Solve a sweating tank problem
If a sweating, dripping toilet tank has been a problem with your current can, choose a pressure-assist model. Since the water is held inside an inner tank, the outer tank won't sweat. Or if you prefer a gravity toilet, order one with factory-installed tank insulation for an additional $50 to $100 (depending on the model).
Figure A: Anatomy of a Good Flusher
A toilet's flushing performance is what matters most. To find a top performer, shop with these features in mind.
Tip 1: Compare flush ratings online
1 of 1
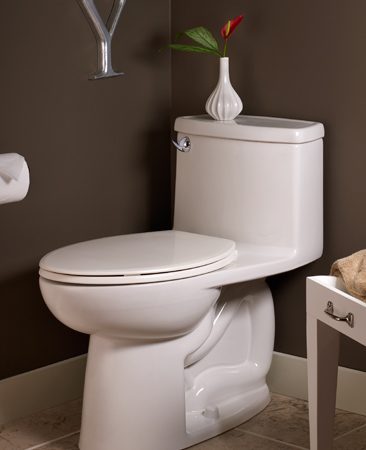
A good flusher
Kohler Cimarron Comfort Height elongated 1.6 gpf, model K-3589; at home centers and online retailers.
us.kohler.com Photo courtesy of Kohler
Since you're probably going to live with your toilet for 10 years or more, it's worth doing 10 minutes of research before you buy. Compare independent test results of the “flushing performance” across manufacturers and specific toilet models by typing “toilet testing 2010” into a search engine.
For more toilet reviews, visit
consumerreports.org and
terrylove.com/crtoilet. Top-ranked toilets include specific models of Home Depot's Glacier Bay; Kohler's Wellworth and Cimarron; American Standard's Cadet 3 FloWise; and Gerber's UltraFlush.
Tip 2: Check for rebates on high-efficiency models
1 of 1
American Standard Cadet toilet
American Standard Compact Cadet 1.28 gpf, model 2403; at home centers and online retailers.
americanstandard.com Photo courtesy of American Standard
A toilet accounts for a third of your household water use. High-efficiency toilets (HET) that use 1.28 gallons or less earn the EPA's WaterSense label. These can save 4,000 gallons of water per person annually, and some water utilities offer rebates if you install one (check with yours). However, check independent test results before you buy (see the Web sites in Tip 1 above). Our plumbers report more staining and clogging problems with some high-efficiency models.
Tip 3: Get a pressure-assist toilet if a clean bowl using less water is a top priority
1 of 1
A pressure-assist toilet
Gerber Ultra Flush pressure-assist 1.6 gpf, model 21-302; at plumbing showrooms and online retailers.
gerberonline.com
According to the plumbers we spoke with, pressure-assist toilets are more water-efficient flushers than gravity toilets. They have a separate tank that holds water under pressure, which releases with great velocity and removes waste thoroughly when you flush. They're also pricier ($100 plus) and a lot noisier than gravity types. (See our field editor comments below.) Finding parts and making repairs can also be more of a headache with pressure-assist toilets.
For more info on gravity and pressure-assist toilets, type “toilet performance” in the search box above.
Tip 4: Make cleaning easier
1 of 1
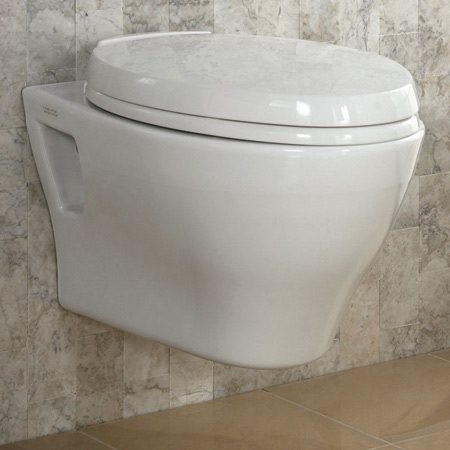
A wall-hung toilet
IMAGE DESCRIPTION (the cutline) Toto Aquia wall-hung high-efficiency dual-flush 1.6 and 0.8 gpf; at plumbing showrooms and online retailers.
totousa.com Photo courtesy of Toto
One-piece toilets are easier to clean (fewer nooks and crannies), but they're also more expensive and can be harder to install than a two-piece unit (they're a lot heavier than a separate bowl and tank). If you're feeling flush and want truly easy cleaning, consider a wall-mounted toilet.
Tips From Our Field Editors
Our field editors from across the country share their insights and experience with new toilets.
“Ho. Lee. Cow. We HATE our toilet. It claims the ability to flush 24 golf balls. Seriously. Maybe it could do 24 golf balls one at a time over a two-week period with a string pulling them down.”
-- Murph Krajewski
Beware of Pressure-Assist Noise
“Our builder installed the LOUDEST toilets in the world. When someone flushes, I have to pause the TV so I don't miss any dialogue. I installed a gravity toilet in my basement, and when our newborn is napping, I make everyone go there to
potty!”
-- Jason Hirsbrunner
“My pressure-assist
toilet flushes extremely well, but it's very loud. It sounds like it's flushing the whole bathroom down with it.”
-- Tom Rohlf
Beware of Nonstandard Parts
“We got an “uber-cool” toilet and I wish we hadn't. The seat is custom, so we'll have to spend $115 to replace it someday, and the innards aren't normal, so when things eventually wear out, we'll be rigging it with odds and ends to make it work.”
-- Kristin Green
Colored Toilets make a House Harder to Sell
“Most people can compromise when it comes to a low vs. high, round vs. elongated toilet, but color is almost always nontransferable from one owner to another! Avoid designer color toilets like the plague.”
-- Joseph Papay, Craftsman & Design Services
Cushioned Seats Don't Age Gracefully
“The first one didn't fit, the next one seemed OK until it cracked and pinched your leg when you sat on it, and the last one made a humorous sound when you sat down. No more cushioned seats!”
-- Bruce Dexter
Add A Tush of Class and Get a Slow-Close, Removable Seat
“We really like the slow-drop seats with the quick disconnect feature for easy cleaning. With two little ones, it saves slamming seats in the middle of the night and makes cleaning a snap.”
--Jack Bauer
Tip 5: Consider a taller throne for comfort
1 of 1
A taller toilet
Gerber Avalanche high-efficiency 1.28 gpf, model 21-824, 17-in. ErgoHeight; at plumbing showrooms and online retailers.
gerberonline.com Photo courtesy of Gerber
Toilets that comply with the Americans With Disabilities Act have higher bowl heights of 17 in. or 19 in. vs. the standard 15 in. A higher bowl can be more comfortable for taller and older people and easier on backs and knees. But it can be harder for kids and shorter folks to use, and it costs $50 to $100 more. If you're not sure, sit on the toilet in the store. It feels silly, but you'll get what you want.
Tip 6: Measure the rough-in before you buy
1 of 1
Measure the rough-in
The rough-in is the distance from the center of the toilet flange (the hold-down bolts) to the wall. Buy a toilet that fits the rough-in distance so you don't have the difficult job of moving the flange.
The distance from the wall to the middle of the flange bolts that hold down the toilet will narrow your toilet choices. Twelve inches is standard, but 10-in. and 14-in. models are available. Unless you're significantly remodeling, make installation easier by choosing a toilet with the same rough-in as your existing toilet. Make sure to account for the thickness of your baseboard.
For how-to tips on replacing a toilet, type “replace a toilet” in the search box above.
Tip 7: Beware of bigger bowls
Elongated bowls are 2 in. longer and more comfortable for many people. But before you upgrade from a standard round bowl, take some measurements. We've heard a lot of stories about doors and drawers that couldn't be opened after an elongated bowl was installed.
Tip 8: Save water with a dual-flush toilet
1 of 1
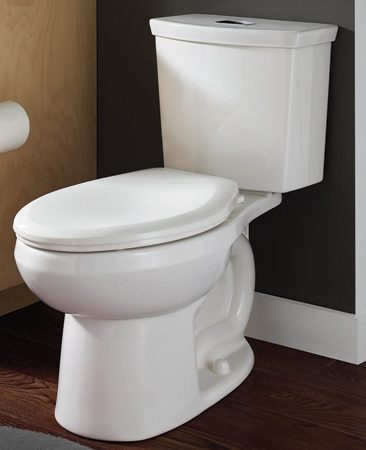
A dual-flush toilet
American Standard H2Option Siphonic Dual Flush Elongated 1.6 or 1.0 gpf, model 2887- 216; at home centers and online retailers
americanstandard.com Photo courtesy of American Standard
These have a .8-gpf button for liquids and a 1.6-gpf button for solids and use about 25 percent less water than a regular 1.6-gpf toilet. Dual-flush toilets are available in both gravity and pressure-assist models. They're pricier than other types (an additional $150 to $300 depending on the model) and they come in fewer color and style options. Also, the flush button or handle can be awkward to push on some models.
A special thanks to "The Family Handyman" for this article.
And for assistance with all of your Home Repair needs, Pro-Fix Home
Repair stands ready to help. Give us a call at 770-575-2533.

Give us a call @ 770-575-2533 or
www.ProFixHomeRepair.com 


 You can call it a "Breaker Box", a "Service Panel", or "The Electrical Box", but whatever you call it, what it does and how it works is probably a bit of a mystery.


 Porcelain, ceramic, natural stone, glass, metal, mosaics, there are so many choices to make when you are remodeling your home that involve selecting tile. Tile can be used as flooring in a kitchen,
foyer, laundry area, mudroom and bathroom, as well as many outdoor
areas. Selecting the right tile means the difference between mediocre
and brilliant design.
What is the difference between ceramic, glazed and porcelain tile? When
and where should glass and natural stone tiles be used?
Porcelain, ceramic, natural stone, glass, metal, mosaics, there are so many choices to make when you are remodeling your home that involve selecting tile. Tile can be used as flooring in a kitchen,
foyer, laundry area, mudroom and bathroom, as well as many outdoor
areas. Selecting the right tile means the difference between mediocre
and brilliant design.
What is the difference between ceramic, glazed and porcelain tile? When
and where should glass and natural stone tiles be used? Porcelain tile:
Porcelain tile can also refer to glazed tile. But most porcelain tiles
are not glazed and are generally much more dense than a glazed tile.
Through-color porcelain tile means that the color runs throughout the
thickness of the tile. Porcelain is a much more dense, durable, heavy
and solid material and is much less porous than ceramic. Generally, it
can stand up to high and low heat, exterior conditions, wet areas and
high traffic floors. Some can even hold up to extreme temperatures and
frost without cracking or damage. It is very popular to use this type of
tile in main flooring areas, commercial applications, exterior areas,
front entryways and kitchens and bathrooms.
It can be a little more expensive depending on the color and
manufacturer, but it is a long term choice and will look good, even with
minor chips, for the long haul. If a piece does get chipped, the color
below is the same as the color on top, so it is generally not
noticeable.
Porcelain tile:
Porcelain tile can also refer to glazed tile. But most porcelain tiles
are not glazed and are generally much more dense than a glazed tile.
Through-color porcelain tile means that the color runs throughout the
thickness of the tile. Porcelain is a much more dense, durable, heavy
and solid material and is much less porous than ceramic. Generally, it
can stand up to high and low heat, exterior conditions, wet areas and
high traffic floors. Some can even hold up to extreme temperatures and
frost without cracking or damage. It is very popular to use this type of
tile in main flooring areas, commercial applications, exterior areas,
front entryways and kitchens and bathrooms.
It can be a little more expensive depending on the color and
manufacturer, but it is a long term choice and will look good, even with
minor chips, for the long haul. If a piece does get chipped, the color
below is the same as the color on top, so it is generally not
noticeable.  Marble and Granite tile:
Marble or granite tile are simply pieces of natural stone that are cut
into a variety of standard tile sizes. These tiles are generally more
expensive than ceramic based tiles, and can vary from a larger flooring
size to a small subway tile, or can be made into sheets of mosaics.
Marble must be sealed regularly to avoid staining and can be slippery
when used in wet areas.
Marble and Granite tile:
Marble or granite tile are simply pieces of natural stone that are cut
into a variety of standard tile sizes. These tiles are generally more
expensive than ceramic based tiles, and can vary from a larger flooring
size to a small subway tile, or can be made into sheets of mosaics.
Marble must be sealed regularly to avoid staining and can be slippery
when used in wet areas.